Introduction
Last year, a large amount of my free time was spent on a server for my personal files and websites.
I've already had some experience with hosting websites and apps on a VPS server. Now, I also needed a NAS, and decided to do an all-in-one solution, that would fulfill my wide range of needs:
- Local and remote access to private and shared files, such as documents, music, movies, pictures, and backups, with security and access control.
- Multi-media DNLA server, to make media files accessible from TVs, smart speakers, etc.
- Flexible web hosting abilities (node.js, PHP, and everything else).
- Download-box with HTTP and torrent support.
- Maybe in the future, a hub for smart home devices.
Having looked into more or less ready-to-use solutions, I couldn't really find the right match, so I've built my own, with a mix of hardware, tons of open-source software, and cool ideas. It's been working great for over a year, so I'm sharing it hoping that it might inspire and help you to also make your own.
The article got very long, so I've split it into multiple parts. Part 2 is available.
What hardware?
There are many possible choices of hardware, from your old computer to dedicated server hardware, depending on your needs.
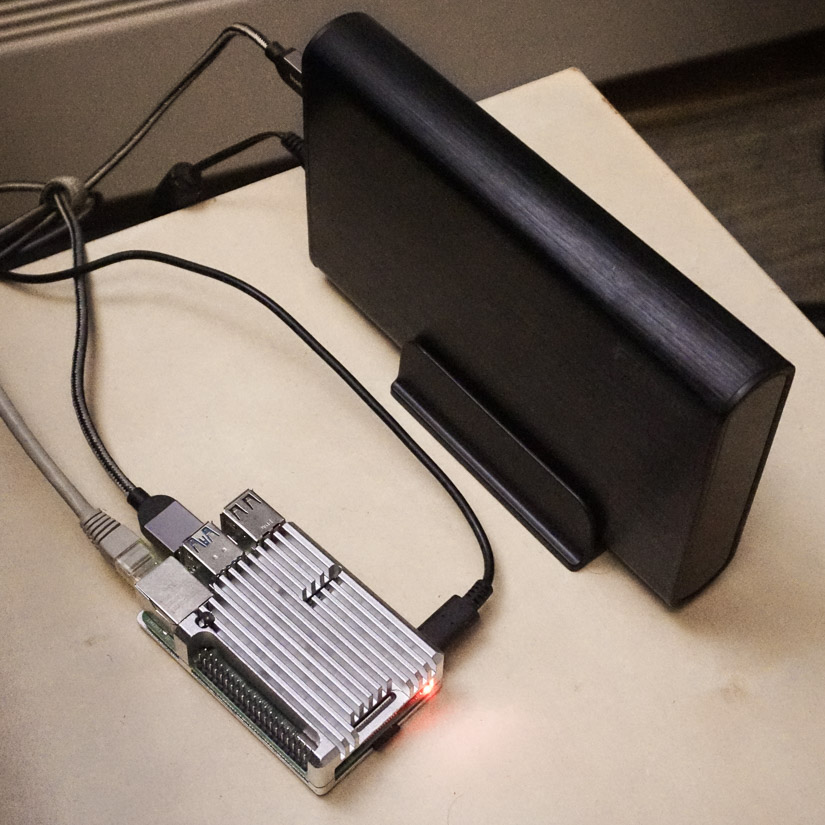
My priorities were low power consumption, good-enough performance, compatibility, and versatility. I settled on a Raspberry Pi based solution:
- A Raspberry Pi 4
- A heat sink case
- The official USB-C power adapter
- An old 2GB microSD card
- A high capacity HDD, either external or inside a USB 3 enclosure.
A Raspberry Pi is not exactly tailored for NAS use, as it doesn't have SATA ports or faster Ethernet. It's however an incredibly versatile, inexpensive SBC (Single Board Computer) with Gigabit Ethernet, a pretty fast processor, lots of RAM, so it's going to do fine as a NAS. It's also extremely power-efficient, has an amazing community and general compatibility.
In 2022, the Raspberry PI is out of stock everywhere and it's near impossible to get it at a reasonnable price. I would personally prioritize the use of an old computer that you have or can buy used/refurbished. The tutorial below will still be valid except the OS card preparation, as the install process is different depending on your platform.
Regarding the storage medium, a single HDD does just fine in my case. I will not use RAID. RAID is great when you want to maximize uptime and/or performance. Neither are essential in my case.
What is essential are backups, and backups are better done on an offline medium.
The software: my opinionated take
And this is where the hard and fun part begins.
Some background: In the past, I attempted to make such a server with a pretty conventional stack (Raspberry Pi 1B + 16GB card + powerful phone charger + Raspbian). After 2 months, the system broke down due to memory card hardware-level corruption. Some sources say it was caused by an unstable power supply. IMO, microSDs are just not made to be used as a usual system partition. Incessant writes wear them out very quickly.
Just to warn you, I have a strong preference towards CLI tools. No GUI tools will be used here 🙃.
Containers
Containers are a method of isolating apps into their own semi-virtualized environments.
I really wanted to use containers (typically Docker) to deploy all the apps. Keeping the main system very basic, and installing apps in containers has some big advantages:
- It can easily be configured to use external storage for all apps and data.
- All apps are isolated.
- All deployments are easily reversible. If you change your mind, deleting the container is all it takes. No dangling packages, libs and config files.
- It opens the door for experimentation.
- Your base system stays clean.
- It forces you to do some basic kind of infrastructure as code. This makes all your deployments repeatable and pretty much automated, if you do it right.
There are a few drawbacks as well:
- Some cross-service integrations get complicated. For example, using
certbotto renew your HTTPs certificates and making it talk with your web server. - More storage is needed, but with the HDD, it really is not an issue.
The operating system
After some research and having tried a few distros, I ended up picking Alpine Linux. It is extremely lightweight, widely supported, well documented, and has a broad repository of well-maintained packages.
More than lightweight, it is designed to work from memory. The root filesystem is in RAM, and your actual storage media is mounted read-only. That's fantastic in our case, because the fragile microSD card is safe from continuous writes that would otherwise be done by a classic OS such as Raspbian.
That raises the question: how are changes in your OS made persistent?
Changes that you want to be persistent need to be committed to the backup archive by running lbu commit. It figures out the differences you made in the filesystem (based on a customizable include and exlude list), and stores the modified files into the archive. This archive is restored when starting the system.
My whole system (including docker) weighs less than 200 MB. The backup archive containing all my configuration is 16 KB. Freaking unbelievable.
Installation
First, let's install and setup the OS with an SSH server to have a working headless system controlled remotely, from your computer.
I have mostly followed the Raspberry Pi guide from the Alpine Linux wiki.
For more details about the tools and environment, feel free to google it. In case something is not clear, please send me a message, for example through the contact form. I plan to add a comment section here later.
Prepare your RPi, its power supply, the memory card, and an Ethernet cable, and a keyboard.
OS card preparation
-
Insert the SD card into your computer
-
Download the right Raspberry Pi build on the Alpine Linux download page. I've chose the
aarch64since it's the most frequently supported by docker images. -
Let's create the boot partition for the Raspberry Pi using command line tools, like a computer god 😎
On Linux
Identify your SD card device (
/dev/...) with:fdisk -lThen run this command with your identified SD card.
⚠ Be sure of the selected device, this will wipe all data on it.fdisk /dev/...Then you can type these commands in order (press m to know their meaning):
o
n
p
1
2048
-0
t
0c
a
w
Then, format the newly created partition:
mkfs.vfat /dev/...On Windows
Run
diskpartfrom either the search bar, the command prompt, or the Run panel.list diskIdentify the disk number of your SD card.
⚠ Be sure of the selected device, this will wipe all data on it.
Then:select disk X
clean
create partition primary
format quick FS=FAT32
active -
Then, extract the content of the archive to the created partition on the SD card. The card is ready.
Alpine Linux configuration
- Insert the SD card into the Raspberry Pi and power it on, with a screen and keyboard connected.
- Login into the Alpine system as root. No password should be asked.
- Run the setup script
You should be fine with default options, except:setup-alpine- Timezone: in my case,
Europe/Paris - NTP client:
busybox, as recommended by the wiki - Mirror: type
ffor detecting the fastest for you, orrfor random
- Timezone: in my case,
- Update the packages:
apk update
apk upgrade - Add your secondary user, and add it to the
wheelgroup (users able to impersonaterootwith thesucommand).adduser konrad
adduser konrad wheel - Commit the changes:
lbu commit
Set a static local IP for your server
Just like any server, your Raspberry Pi needs to have a static IP address. This way it will keep the same address, even after a complete reboot of your whole infrastructure.
You can get the MAC address with the command ip addr:
ip addr show dev eth02: eth0: mtu 1500 qdisc mq state UP qlen 1000
link/ether XX:XX:XX:XX:XX:XX brd ff:ff:ff:ff:ff:ff
inet 192.168.X.XX/24 brd 192.168.X.XXX scope global eth0 Then, you need to go to your router's settings web page, and in the DHCP section, assign a static IP of your choice to your device's MAC address.
If needed, please find information about how to do it on your specific router from other sources.
Try SSH connection
Now, you can connect through SSH to your Raspberry, with the newly configured static IP, user, and password:
ssh konrad@192.168.X.XFrom you user account, you can go into superuser mode with the su command.
Configure SSH keys
To be able to access to the server without a having to type the password every time, let's add authorize your public key on both the user you created and root.
If you don't know much about SSH keys, please refer to other sources, for example SSH Essentials: Working with SSH Servers, Clients, and Keys.
If you have no key (id_* and id_*.pub files in your ~/.ssh directory), generate one with:
ssh-keygen -t ed25519 -C "your_email@example.com"Authorize it on your server with:
ssh-copy-id konrad@192.168.X.XNow, you should be able to connect without needing to type your password:
ssh konrad@192.168.X.XBy default, password-authentication will not work with root through SSH. You can only login with a key. So let's authorize your key also on the root account.
On the RPi, copy your ~/.ssh/authorized_keys to root's .ssh dir.
su
cp -R .ssh /root/
chown -R root:root /root/.ssh
SSH-ing to root should now be possible, and not require the password.
ssh root@192.168.X.XConclusion
We have now configured the foundation of the server.
Keep going with the next part, where I explain how to set up the hard drive, Docker, and NAS-related applications.
Thank you for reading.